How to Dry Wood Without a Kiln: A Comprehensive Guide
Drying wood is an essential process for woodworkers, carpenters, and DIY enthusiasts. While kilns are the most efficient way to dry wood, they can be expensive and not always accessible. Fear not! You can achieve excellent results without a kiln by using some tried-and-true methods. This guide will walk you through everything you need to know to dry wood effectively, even if you don't have access to a kiln.
Understanding Wood Moisture Content
Before diving into the drying methods, it's crucial to understand why wood needs to be dried. Freshly cut wood, also known as green wood, contains a high amount of moisture. This moisture can cause several problems:
- Warping and Splitting: Wood can warp or split as it dries unevenly.
- Decay and Mold: Excess moisture fosters mold growth and decay.
- Difficulty in Working: Wet wood is challenging to work with, especially for fine woodworking.
To ensure the wood is dry enough for use, aim for a moisture content (MC) of around 8-12% for indoor projects and up to 20% for outdoor projects. You can measure this using a moisture meter.
Methods to Dry Wood Without a Kiln
1. Air Drying
Air drying is the most traditional and straightforward method. Here’s how you can do it:
Step 1: Preparing the Wood
- Cut the Wood: Cut your wood to the desired dimensions.
- End Seal: Apply a sealant like latex paint or a commercial end seal to the ends of the wood to prevent rapid moisture loss, which can cause splitting.
Step 2: Stacking
- Choose a Dry Location: Find a dry, well-ventilated location, preferably under a shed or a covered area.
- Elevate the Wood: Place the wood on a level surface raised off the ground using bricks, blocks, or wooden spacers.
- Stack Evenly: Stack the wood with spacers (stickers) between each layer to allow airflow.
Step 3: Monitoring and Rotating
- Check Regularly: Periodically check the wood for moisture content and signs of mold or pests.
- Rotate if Needed: Rotate the stacks occasionally to ensure even drying.
Pros: Simple and cost-effective.
Cons: Takes a long time (several months to a few years).
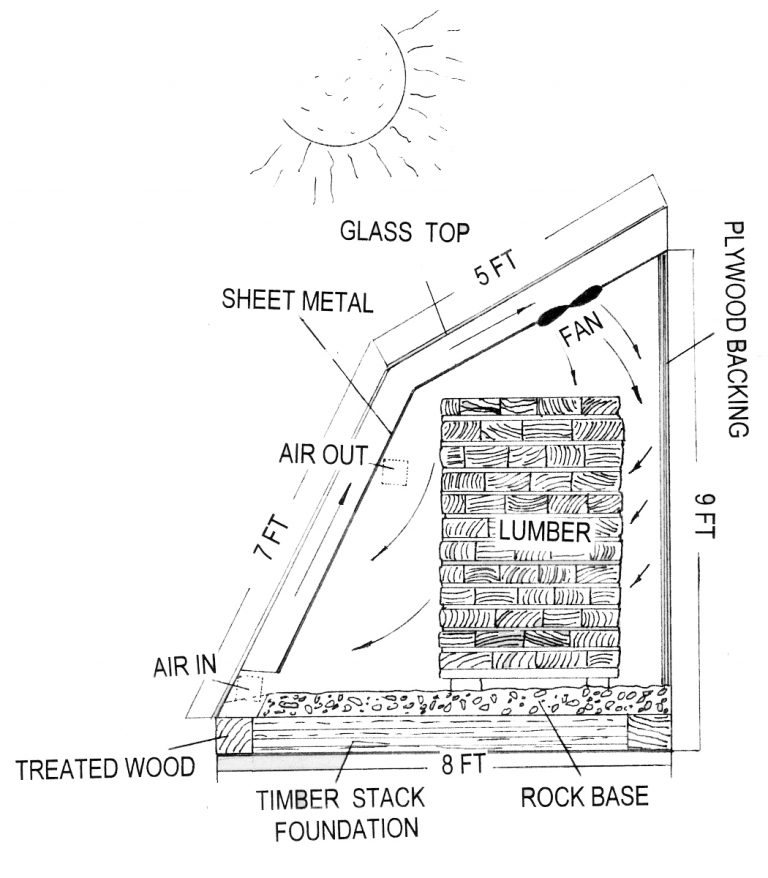
2. Solar Drying
Solar drying is a step up from air drying, utilizing the sun’s energy to speed up the process.
Step 1: Building a Solar Kiln
- Materials Needed: Clear plastic or glass, wood for the frame, black paint, and insulation.
- Design: Build a small greenhouse-like structure. Paint the interior black to absorb heat and cover it with clear plastic or glass.
Step 2: Stacking and Ventilation
- Stack the Wood: Inside the solar kiln, stack the wood similarly to air drying.
- Ventilation: Ensure good ventilation by incorporating vents that can be opened or closed to regulate temperature and moisture.
Step 3: Monitoring
- Temperature Control: Monitor the temperature to prevent it from getting too hot, which can damage the wood.
- Moisture Control: Regularly check the moisture content.
Pros: Faster than air drying and more controlled.
Cons: Requires building a structure and can be weather-dependent.
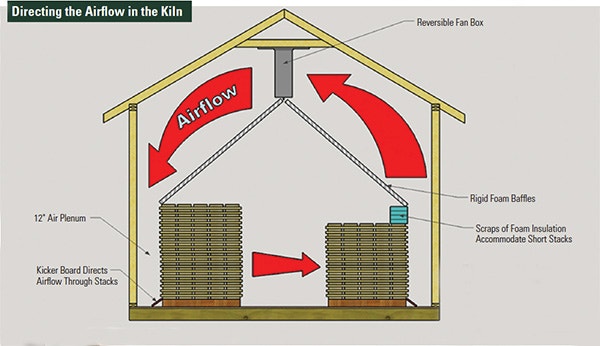
3. Dehumidifier Drying
Using a dehumidifier in a small, enclosed space can effectively dry wood.
Step 1: Setting Up
- Enclosed Space: Use a basement, garage, or a makeshift chamber made from plastic sheeting.
- Dehumidifier: Place a dehumidifier in the space.
Step 2: Stacking and Spacing
- Elevate and Stack: Elevate the wood and stack it with stickers for airflow.
- Space: Ensure enough space around the dehumidifier for air circulation.
Step 3: Monitoring
- Check Moisture Levels: Regularly measure the moisture content.
- Adjust Settings: Adjust the dehumidifier settings as needed.
Pros: Faster than air drying, works in any weather.
Cons: Requires electricity and can be expensive to run for large batches.
4. Microwave Drying (for Small Pieces)
For small pieces of wood, a microwave can be an effective method.
Step 1: Preparing the Wood
- Cut Small Pieces: Ensure the wood fits inside the microwave.
- Wrap in Paper Towels: Wrap the wood in paper towels to absorb moisture.
Step 2: Microwave in Short Bursts
- Short Bursts: Microwave the wood in short bursts (30-60 seconds) at low power.
- Check Frequently: Check the wood frequently to avoid overheating and burning.
Step 3: Cooling Periods
- Allow to Cool: Let the wood cool between bursts to prevent stress and cracking.
Pros: Very fast for small pieces.
Cons: Not suitable for large pieces, risk of burning.
Tips and Tricks for Effective Wood Drying
- Choose the Right Wood: Hardwoods typically take longer to dry than softwoods.
- Patience is Key: Rushing the process can lead to poor results.
- Consistent Monitoring: Regularly check the wood for moisture content and condition.
- Pest Control: Keep an eye out for pests and treat the wood if needed.
Conclusion
Drying wood without a kiln is entirely feasible and can be done using various methods suited to different needs and scales. Whether you choose air drying, solar drying, dehumidifier drying, or even microwave drying, each method has its pros and cons. The key is to be patient and consistent in monitoring the wood's condition.
By understanding and applying these techniques, you'll ensure your wood is properly dried and ready for all your woodworking projects. Happy woodworking!
Visual Gallery
Air Drying

Solar Drying

Dehumidifier Drying

Microwave Drying

Feel free to experiment with these methods and find what works best for you. Each piece of wood is unique, and so is the drying journey!

